In response to a question posed on a Burning Man email list, Argyre made the following helpful reply. I asked for and received permission to Webify the answer and put it on the Web. The question was how to make a geodesic dome using a parachute.
How big a chute are you looking for? Berkeley Surplus on University has some, generally in the 28 to 32 foot diameter range. I know that some cargo chutes can be much larger than that (45-60 foot).
And I'm with Todd on some of his complaints about domes. To build a decent one, there is a fair amount of structure (a lot of "stuff") and you wind up with a relatively small enclosed space. Say you get a 28ft chute, and build a hemispheric dome that uses this. The joys of simple geometry yields a radius of about 9 feet, at ground level (or 18 ft across), and a 9 foot center height. So you have standing headroom (call it 6 foot) for a space about 12 feet in diameter. Not a lot of space.
Note also that while it is enclosed and private, you also can't see anything happening around you, and no one will come and visit. While it will provide some shade, it will have limited airflow. If it IS windy, it presents a serious surface that must be capable of holding it's own against the full force of the wind.
I struggled with this last year prior to hitting the desert, and was also constrained by what I could carry. I'm a geodesic dome fan from way back and really wanted to, but decided it was not a good choice.
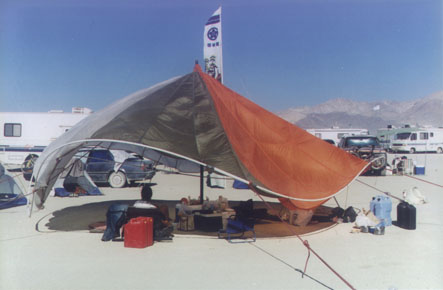
So, instead, I used my parachute to make a giant parasol. Very fast to put up, minimal materials, minimal staking.
I found two sizes of the stiff black ABS pipe that nested perfectly, and a length of steel pipe that also nested inside the larger of these. A handy fence post pounder (similar to the police battering rams you've seen on bad tv) allows you to quickly drive the steel post a few feet into the playa (or whatever).
You attach the center of the chute (where all the lines cross) to the top of the smaller ABS pipe (notching the top works, and having some holes drilled across the top is handy, use wire ties to keep the chute in place). I actually had drilled some holes across the diameter of the inner and out tubes that would take a large long bolt (allowing me to adjust the height of this center post), and also place a long bolt through the top of the post, just below the chute attachment. This provided a convenient spot to attach six 30 foot lengths of rope (actually three 60 foot lengths, attached at their midpoints, but either will work).
Insert the smaller tube inside the larger tube, and lift the whole arrangement of parachute, ropes, and two tubes up and slide it down over the pipe in the ground.
At this point you have a stick in the air with a chute draped over it. You could stretch the ropes out equidistant and stake them, and tie the chute to the ropes, but it would stil be pretty floppy...
Here is where the parasol part of the design comes in. Take about three 20 foot lengths of Sched 40 PVC and make a hoop out of it. you'll find that the built-in connector neck will not be strong enough when you flex the tubing into a circle, so you will have to reinforce the three connect points with a short (1-2 foot) length of larger diameter pipe that will fit over the joint. When the hoop is done (and it should go on top of the guylines!) you need to tie the edges of the parachute to the hoop. As you might guess this means you want to look for a parachute that still has all or most of the guylines with at least a foot of cord left.
When we assembled this, I initially had the center post up at around 17 feet, but the inner pipe wasn't quite up to the wind loads and flexed badly. Dropping it to about a 12 to 14 foot center height worked well, and put the edge of the hoop at about chest to head height. Provided a huge amount of shade for people and gear, 360 degree view, total airflow, and only six lines and stakes to worry about, and the lines were heavy enough that they were hard to miss (used old climbing ropes, discarded by climbing gyms).
After construction, we discovered what seemed a design flaw, in that the PVC used for the hoop was too flexible, allowing the edge to be sort of a trefoil. Between pairs of ropes the edge would either drop down or tilt up (alternating), leaving three edges of the circle close to the ground, and three edges quite high. Made it easy to enter and exit (go through the high doorways) but looked kinda sloppy. I had designed the damn thing thinking of the angle of the little parasols found in tiki drinks, and that is a very straight line...
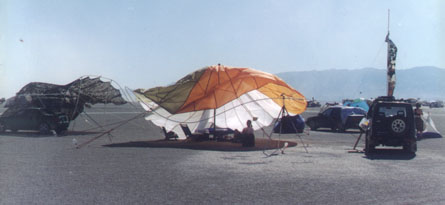
With the arrival of the first serious wind, this "flaw" appeared as a benefit. No matter what direction the wind came from, this structure flexed to handle it.
It would either inflate the chute quite nicely, and spill under the high edge, or it would try to push the low edge (if that was the wind direction) down, but spilled easily over the top and sides.
The worst problem we had was keeping the slider knots tight on the big stiff climbing ropes. Had to retension the guylines several times a day. I think I have solutions for this.
Gives a very bedouin feel to camp.
[In response to a follow up question about the post- driver and other tools to construct the parachute home -- ]
Now, the post-pounder never even approaches the ground, unless you're driving something in to where less than two feet are sticking up...so your toes are not at risk. Blisters on your hands, however, could be an issue.
Hacksaw is handy, and so are the incredibly small, cheap flexible PVC cable saws that Home Depot has racked by the PVC.
Instead of the battery powered drill, I find that retired surgical hand drills are an excellent choice, especially for PVC. Punch good sized holes quite quickly, no noise, no juice required. great objects, too.
Always handy to bring a LOT of wire ties (big ones, the Home Depot cannister is a nice selection), as well as an assortment of fasteners (nails, screws, nuts, bolts, washers, especially some big'un's) and the appropriate fastener tools. [And duct tape -- The Civilized Explorer]
--
Argyre Patras
For additional information on determining the sizes of the materials you have and the materials you will need, see page 2.
This is not the official Burning Man site. That Web site is located at Burning Man.